Overview
The datasheet view in Microsoft Access offers a range of features and capabilities that empower users to manage and analyze their data efficiently. Its familiarity, flexibility, and integration with other Office applications make it a valuable tool for various data-related tasks.
- Ease of Data Entry:
- Familiar Interface: Many users are already accustomed to working with spreadsheet applications like Excel. The Datasheet view in Access provides a similar grid-like interface, which makes it easier for users to start entering data without extensive training.
- Intuitive Navigation: Users can navigate through records using familiar keyboard shortcuts (such as arrow keys or Tab/Shift+Tab) or mouse clicks. This makes the data entry process more fluid and efficient.
- Quick Data Analysis:
- Sorting and Filtering: Datasheet view allows users to sort data based on one or more columns, enabling them to organize information in a meaningful way. Filtering options further enhance this capability by allowing users to display only the records that meet specific criteria.
- Quick Calculations: Datasheet view supports basic calculations within columns. Users can create calculated totals like sums, averages, or other aggregations for any column in the view.
- Search Functionality: Users can quickly search for specific data within the Datasheet view, making it easy to locate relevant information. This saves time and effort compared to manually scanning through large datasets.
- Sub-forms / Drilldown Capabilities: With the datasheet view, you can incorporate sub-sheets for drill-down capabilities. This functionality lends itself to the implementation of:
- Hierarchical structure such as a task list with sub-task associations.
- Relational records that fall under the current record/entity
- Summary details
- And more (the sky is the limit)
- Customization and Flexibility:
- Column Resizing: Users can adjust the width of columns to accommodate different types of data or to prioritize the display of certain fields. This customization helps users optimize the layout for their specific needs.
- Conditional Formatting: Access allows users to apply conditional formatting to highlight important data or identify outliers. This visual cueing helps users focus on key insights and identify trends more effectively.
- Direct Editing and Updating:
- In-Line Editing: Datasheet view supports in-line editing, allowing users to make changes directly within the grid without switching to a separate editing mode. This streamlines the data editing process and reduces the number of steps required to update records.
- Batch Updates: Users can select multiple records in the Datasheet view and apply changes to all selected records simultaneously. This is particularly useful for bulk updates or data cleanup tasks, saving time and effort for users.
- Integration with Other Office Applications:
- Seamless Data Transfer: Access integrates smoothly with other Microsoft Office applications, such as Excel, Word, and Outlook. Users can easily copy data from Access and paste it into other Office programs, or vice versa. This interoperability enhances collaboration and allows users to leverage the strengths of each application within their workflow.
- Speed of Implementation: Design, development, and change management requires less development time than the standard and multi-record forms.
Given all the advantages of the datasheet view, this becomes a powerful and flexible presentation tool for any application. With little code to implement and minimal time to design, the datasheet can be implemented for any selection form, sub-form, or alternative view to the application with minimal effort.
Designing and controlling the datasheet view via the Form Design View
This series’ first part focuses on controlling the user’s action and preventing them from saving and persisting their configuration changes. You can’t prevent users from ordering, sizing, and hiding fields. Still, you can set the datasheet to reconfigure on load and base the default layout on the form design configurations with a simple VBA routine that reads the form design properties and applies them to the datasheet and column properties of the datasheet view.
What are these datasheet and column properties being managed?
What properties are available to the datasheet and how are they translated? The core properties are broken into two categories:
- Column Properties
- ColumnHidden (utilize the form design properties to set ({Control}.Visible))
- ColumnOrder (utilize the form design properties to set ({Control}.TabIndex))
- ColumnWidth (utilize the form design properties to set ({Control}.Width))
- Locked (automatically derived from form design properties) – Auto Propagated from the form design, No additional work needed
- Enabled (automatically derived from form design properties) – Auto Propagated from the form design, No additional work needed
- TextAlign (automatically derived from form design properties) – Auto Propagated from the form design, No additional work needed
- TextFormat (automatically derived from form design properties) – Auto Propagated from the form design, No additional work needed
- Datasheet Properties
Items that affect the datasheet on the whole and not per column. You can isolate and implement column-level font properties through the use of Conditional Formatting as you would traditionally at design time.- DatasheetAlternateBackColor (utilize the form design properties to set ({Detail}.AlternateBackColor))
- DatasheetBackColor (utilize the form design properties to set({Detail}.BackColor))
- DatasheetBorderLineStyle (not addressed in this process)
- DatasheetCellsEffect (not addressed in this process)
- DatasheetColumnHeaderUnderlineStyle (not addressed in this process)
- DatasheetFontHeight (utilize the form design properties to set (Derived from the controls FontSize)*)
- DatasheetFontItalic (utilize the form design properties to set (Derived from the controls FontItalic)*)
- DatasheetFontName (utilize the form design properties to set (Derived from the controls FontName)*)
- DatasheetFontUnderline (utilize the form design properties to set (Derived from the controls FontUnderline)*)
- DatasheetFontWeight (utilize the form design properties to set – with limitations (Derived from the controls FontBold)*)
- DatasheetForeColor (utilize the form design properties to set (Derived from the controls Forecolor)*)
- DatasheetGridlinesBehavior (not addressed in this process)
- DatasheetGridlinesColor (not addressed in this process)
*Since it is not known what control should be used as the default for the font and colors of the datasheet, it is assumed that all the controls have matching attributes or that the last control represents the desired default format for the datasheet Font and Colors properties.
The Example
The below sample is based on the Northwind Applications Order form. I have replaced the original “Continuous Forms” form with a datasheet view.
In the application’s design of the “Orders” datasheet, the designer sets the column order for ease of use, action activities, and required display of columns to assist in the overall function of the grid and the desired workflow. Users can move, hide/show, and resize all the columns available on the datasheet. The user’s configuration changes may impede the purpose and functionality of the datasheet. The application can’t restrict the user’s actions regarding the datasheet configuration. Still, we can reset or undo their actions on crucial events of the form (i.e., OnLoad, OnExit of Supporting Control).

Key fields and purpose
? = Action Menu, this control allows for specific action to be performed on the datasheet record and must be visible at all times, and should maintain its ordinal position as the 1st column of the grid.
OrderId, this column is the link to load the order detail form, if hidden there is no functional way to navigate to the detail form.
Other Fields are defined with mandatory visibility to provide the user with the necessary information for the workflow and function of the grid.
Suppose the user hides and rearranges fields, like below. In that case, they have effectively removed the ability to perform the load of the Order Details Form as well as affected the standard purpose of the form. We must control these actions.

To overcome these issues, we have implemented a process that can reset the datasheet configuration for each load of the form. The iteration for loading the default configurations is up to the designer and can be managed from other form events. For the detailed steps on this process see the below section titled default view for a datasheet – The Process.
Setting a default view for a datasheet – The Process
Setting up the datasheet, using the Forms Design builder
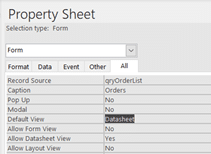
The process of setting up a datasheet form involves several key steps to ensure a proper display in the datasheet view. First, the form should be configured to default to the “Datasheet” view and restricted access to the Form View. Next, all necessary fields are added to the form. Controls are then arranged in the desired column order, with the tab order set accordingly. Horizontal sizing is adjusted to match the desired column widths, while vertical sizing is set to the desired row height, typically single or double lines. Visibility properties are toggled for controls not displayed in the default view. Font properties are standardized across all grid controls to maintain consistency, with the option for conditional formatting for specialized formatting needs. Finally, the Datasheet_Format_Standard code snippet is applied to the form’s onload event to ensure proper formatting. The following steps illustrate each process.
- Open the form that is going to be used as the datasheet.
- Set the default view = “Datasheet” and disallow the ability to view in Form View.

- Add all the fields to the form to which you would want the user to have access.

- Set the default view = “Datasheet” and disallow the ability to view in Form View.

You could only add those fields that are going to be visible by default, BUT generally, there are additional fields that may need to be referenced either by the user or the application, so I generally err on the side of caution and place fields that may be required whether visible or not. I know some will argue we should only add those fields that have an immediate usage for performance. Still, since I have seen minimal performance issues with this addition of increased flexibility, I say find the appropriate balance that suits the application’s needs.
3. Order the controls accordingly and set the tab order.
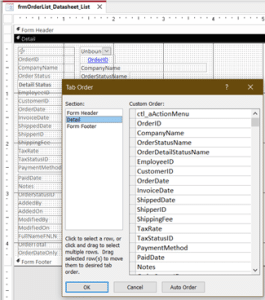
This will provide the basis for the column orders.
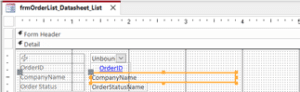
4. Horizontally size each control to the size of the column in the datasheet view.
5. Vertically size all the controls to the desired row height for the datasheet.

Generally, I keep the standard single line but if you would like to have two lines per row then set the controls accordingly.
6. Toggle the visibility property for each control that should not be displayed in the default view.
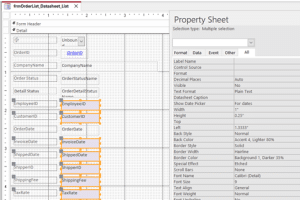
As a general practice, toggling the backcolor of each control that is not visible for ease of identification is employed in this example.
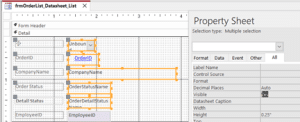
7. Set the font, font size, bold, and italic properties for all the grid controls to be the same.
Note that these attributes are set to all controls to ensure the datasheet font attributes match. Otherwise, it will take the last control in the process order and use its font attributes for the entire grid. You can’t have individual columns with different font attributes without special coding (conditional formatting), which may cause severe hits to the datasheet display rendering performance. If a column or a few columns need specialized formatting, then the designer can add conditional formatting, and it will persist.
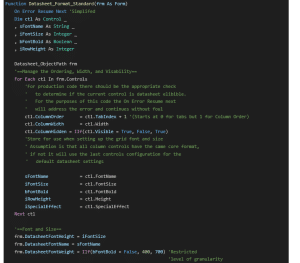
8. Add the Datasheet_Format_Standard code snippet to the onload event of the form. The call should look like:

The Code
Datasheet_Format_Standard, the controlling vba function that takes a form object (“frm”) as input and formats its controls based on the form design properties. The function iterates through each control on the form, setting properties such as column order, width, and visibility based on control attributes. It also captures font-related properties from the controls to apply them to the datasheet format, assuming consistency across controls. Additionally, the function sets the font and size, font weight, background color, alternate background color, and row height for the datasheet.
For simplicity, the below code uses “On Error Resume Next”. The production code should utilize procedures to test for properties and control types to manage the assignment of datasheet and column properties.

What is Next?
The next topic (coming soon) will be the implementation of user datasheet customizations with the ability to save for persistent use.
Key features include:
- Ability for users to save and name configuration tied to datasheet/
- Application controls for the designer/developer restrict control.
- Position Lock: Keep in a predefined position for certain columns.
- Action Items 1st column
- Line totals last column
- Visibility Locks: Prevent users from toggling the visibility of key columns.
- Control pair locks: Keep controls that interact as a pair in the same ordinal position.
- Date and CustomDateTypePicker (i.e., Tomorrow, Next week, and etc.…)
- Position Lock: Keep in a predefined position for certain columns.
