NOTE: I will be talking about this topic in depth in the upcoming Access and SQL Server monthly webinar on July 9th at 6:30 PM CDT. Register so that you can view the process live and ask questions!
As we work with several applications and sometime in a team, source code control is pretty important for managing changes. We’ve come to love using git for our projects. Originally, using git with Access would be a challenge but thanks to an add-in named OASIS-SVN, we can effectively use git with Access projects for managing the changes.
Why use source code control? Can’t you just zip it up?
The main goal behind source code control is to be able to easily answer whodunit.
That is especially critical when you’re dealing with a bug report and you are reminded that you saw something similar before and you thought that maybe you fixed it but the customer’s still reporting it. However, when the bug was “fixed” six months ago, it might be as well be a brand new bug because we’ve already forgotten about the fix we put in 6 months ago. I don’t know about you but the prospect of digging through a bunch of zipped backups does not feel very … discoverable.
Putting your changes in a source code control requires discipline but will make it much easier to review and manage changes. You can easily search the history and see what exactly change.
Another scenario is figuring out what exactly changed. If you’ve made several changes and you need to review them before you push a new version, that’s where source code control helps you out. You have an opportunity to check your work and make sure you did all what you set out to do. No more “I think I did do that already.” only to be told by the client you forgot that minor detail the client asked you about last week. Furthermore, this enable the team to do code reviews for others; we can look at others’ work and provide feedback and help each other maintain a high standard of quality.
Why git? Access works with Visual SourceSafe doesn’t it?
In versions prior to Access 2013, Access supported source code control natively but it did using a proprietary Microsoft specification, MSSCCI. To make it worse, the specification assumes a check-out/check-in model which gives developers an exclusive lock over the objects they are working. Furthermore, the tables within the Access application were basically one big blob that couldn’t be read let alone reviewed.
In practice, such model is very cumbersome to use even in a small team settings. One main issue is that a change request seldom is confirmed to only one object; the developers may find themselves needing to touch more than a handful of objects and thus, collisions can be inevitable, especially for the core/shared modules.
Git avoids all the ugliness that we see with old check-out/check-in model but this does require a different philosophy in managing the changes. Instead of checking out something, we just work off a branch and when we’re done with it, we merge it back into the main branch. We can have several branches in parallel if we wanted though in practice, we only need 2 or 3 parallel branches; one to represent the production version; other for development and maybe a third for critical bug fixes. This can be done with an Access project, and should be. Otherwise, it can be very difficult to keep track of what is going into the production file, especially for non-trivial applications.
An excellent resource for learning git can be found here; it has a sandbox so you can play along. If you’re like me and like to chomp down on the meaty bits and know how it works, this is a good resource.
Finally, just stop using Visual SourceSafe already. It’s buggy, prone to losing your data and hasn’t been supported for _years_, not even by Access since 2013.
But if Access 2013+ no longer supports source code control, how could we have it still?!?
Because OASIS-SVN is not a MSSCCI provider but just a plain Access add-in. There are other similar Access add-ins (e.g. Ivercy for example) that works around the limitation. In all cases, those addins make heavy use of exactly same undocumented methods that Access used internally for source code control; Application.SaveAsText and Application.LoadFromText. Those methods are still present in the current version of Access. On an aside, there’s a UV item to document it to ensure the continuity. OASIS-SVN continue to work well even with the current Access version.
Why do you keep talking about OASIS-SVN and git? Can I just use one or other?
It’s important to understand that both tools are complementary and you need both. See, the reason why you need OASIS-SVN is to make it easy as possible for you to take out your hard work and represent them as a bunch of text files, rather than having them inside a big blob of a binary file that is the ACCD* file. It does not make sense to have the ACCDB file be source code controlled because it would not have a proper history of change and would be largely unreadable. Thus, OASIS-SVN is the tools to create the text files that can be used to rebuild your Access application, and it’s git’s job to actually source-code those files. The git cannot and should not work with the ACCDB file.
If you are new to git, you do have an extra step compared to what others usually do on their Visual Studio projects because you are working with a binary file, not an actual set of folders with bunch of text files with funny extensions. So you will need to get in habit of consistently exporting/importing your changes between the ACCDB file and the text files that composes your git repository.
Prerequisites
To get started, we do need 3 pieces of software:
Strictly speaking you do not need the 2nd and 3rd software. You actually could make do with only the first but the big downside is that you’d have to manually export/import by writing your own VBA module to do this and believe me, that is a lot of work for reasons that will become clearer as we follow along. Thus, OASIS-SVN is strongly recommended. You also don’t have to have TortoiseGit, but I really like having a GUI to make it easy to work. That may offend some command line purists who will tell you that you should just use git in a command line, not via a pretty GUI. However, I like it lazy and quick and most of time, the process is simple that it’s quicker for me to just execute command from a menu than to open up a bash shell and type in some command. That said, TortoiseGit is really just a thin wrapper over git commands, so you should do well to pay close attention to what git command it runs and what it means.
Install them all; I’ll refer to their respective websites for detailed instructions. Once this is all set up, you need to have a project you want to put in control. Furthermore, you need a place to act as your upstream repository. Maybe you have an Azure DevOps account? Bitbucket? GitHub? There are several options available to you for hosting your source code control. Heck, if you are inclined, you could even set up a private git server. But that’s also outside the scope of the article. Again, I refer you to the respective provider’s documentation for setting up a blank repository.
Once you have a blank repository, you should be provided a link to it. We use Auzre DevOps, and we’ve created a new repository located at this URL:
https://samplecompany.visualstudio.com/DefaultCollection/z_Sandbox/_git/SampleApplication
Now that we have a link for a blank repository, we can get setup.
Creating a local repository
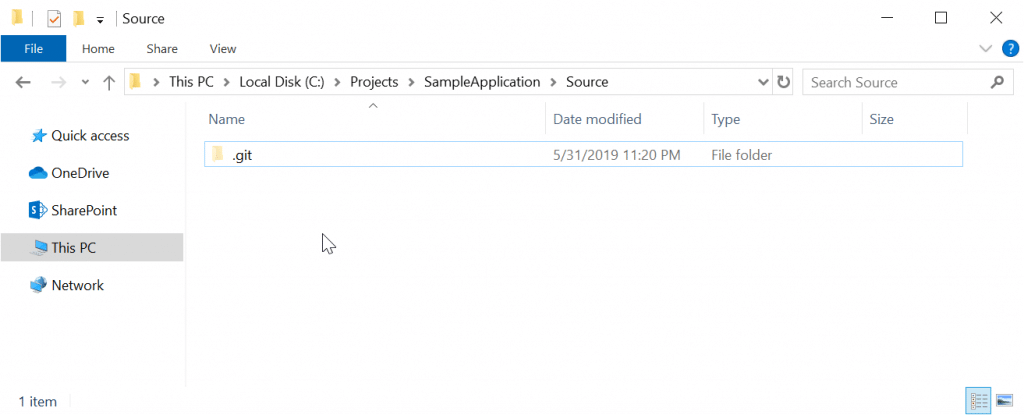
Though OASIS-SVN has a wizard, I find it easier to clone a existing repository and work from there. You are free to use the wizard which will do something similar but I think following along the manual way will help you understand what is really happening and make it easier to work with the tools. We will suppose that we have an application in a particular folder:
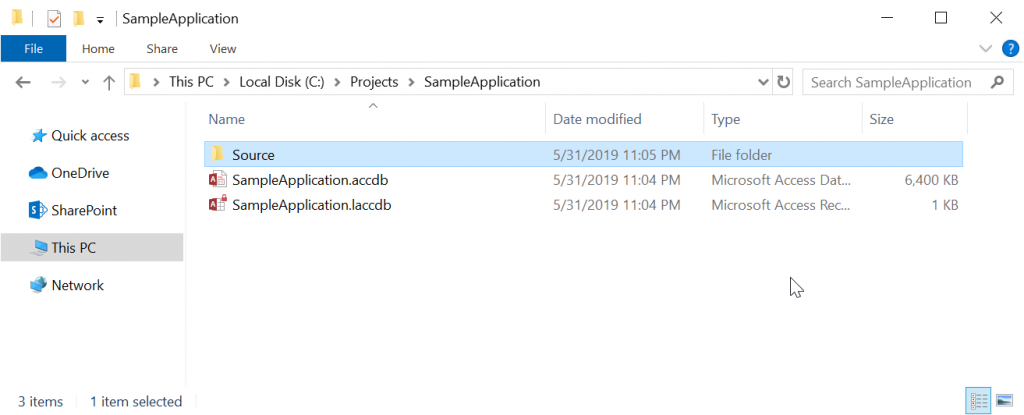
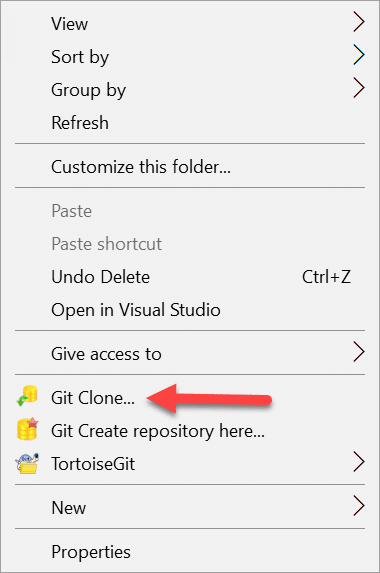
The Source folder is empty and will be where we will house the text files for our local repository. We can right-click on white space in the folder to open up the TortoiseGit context menu and choose clone repository.
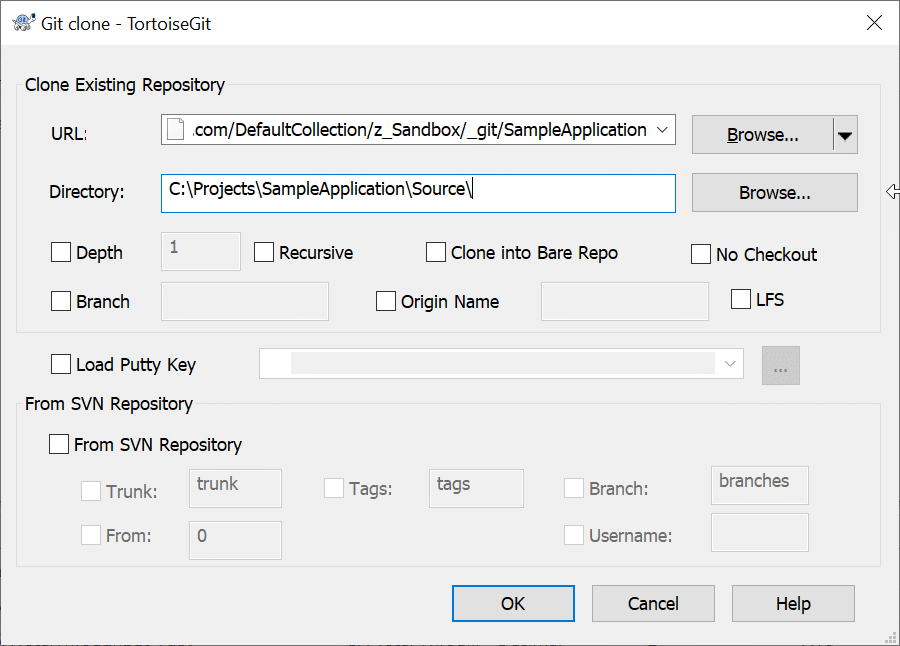
In the dialog that opens, put in the URL you got from your hosting provider:
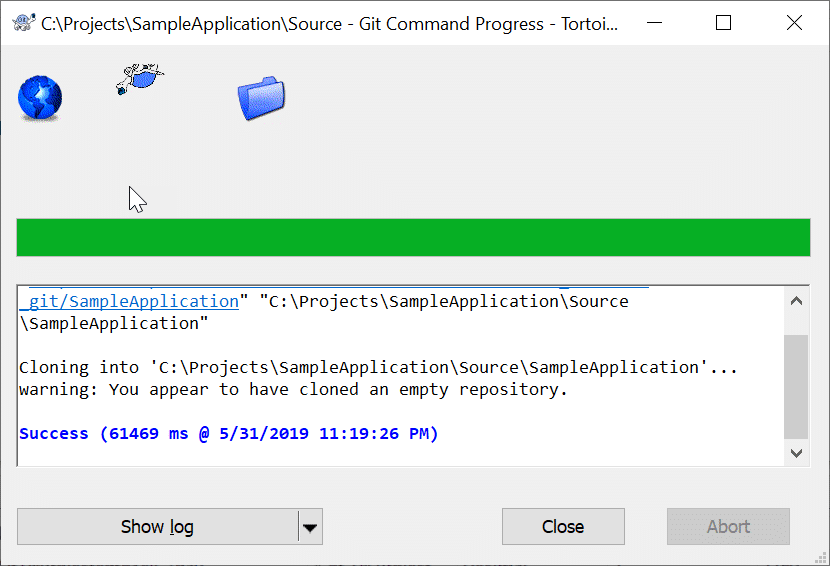
You should then get a success dialog that the repository has been cloned:
As an effect of cloning, you will now have a hidden folder named .git. That is how git keeps track of your commits and changes in your local repository.
We now have a working local repository that we can then use for holding our text files from Access. We will need to configure OASIS-SVN to make use of this.
Configuring OASIS-SVN
As mentioned before, OASIS-SVN has a wizard that can be used to get us set up but we want to do this manually so you are familiar with how OASIS-SVN works and thus can use the wizard effectively. We will start by going to the Settings menu on the OASIS-SVN ribbon tab.

This will open up the dialog. For right now, we only need to do only one thing; set up the source path. In general, I find it more convenient to use relative path rather than absolute path, so we will put in \Source as illustrated:
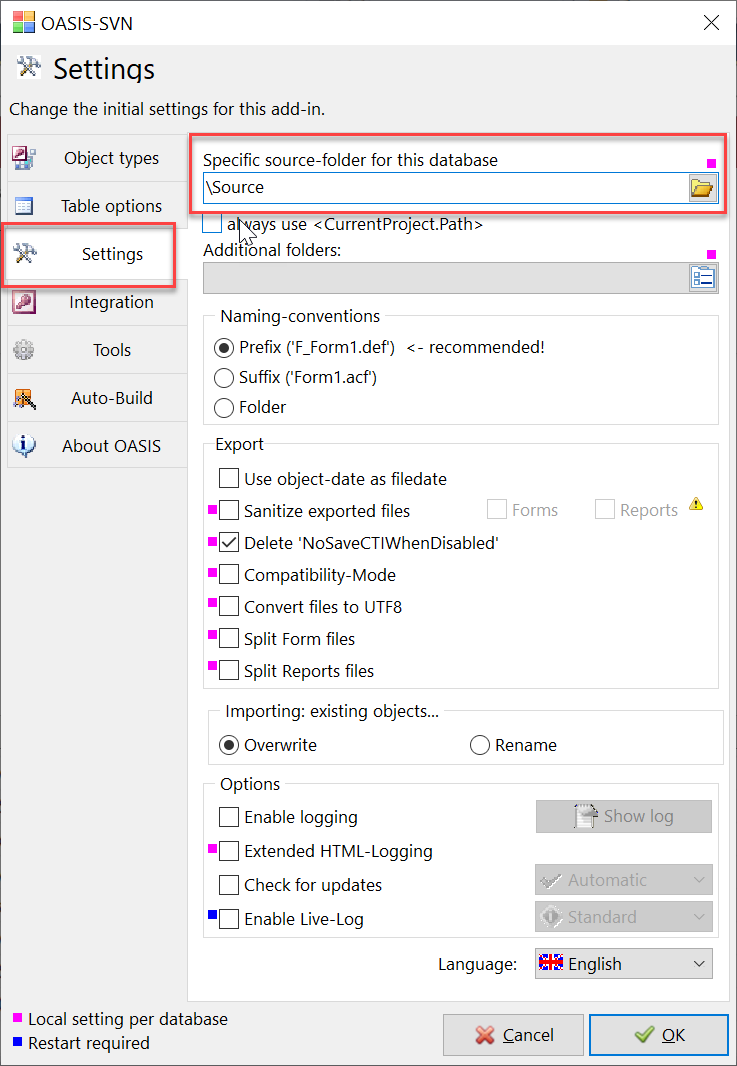
Once put in, you should then check the checkbox always use <CurrentProject.Path>:

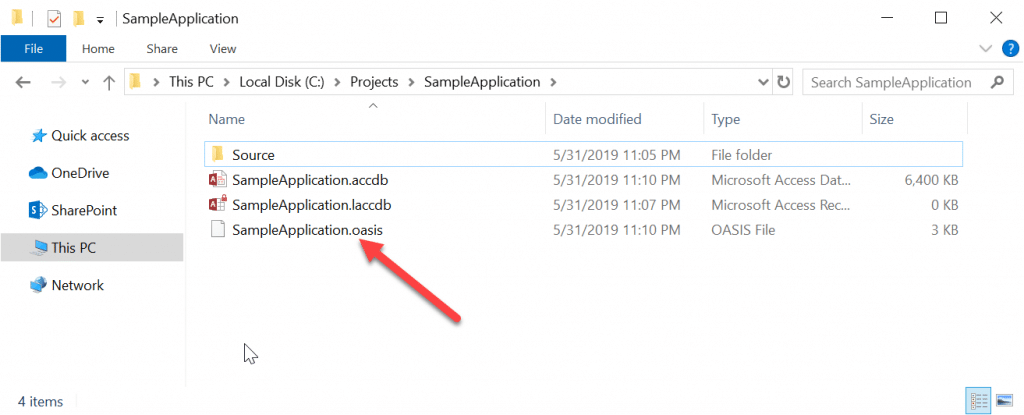
That makes the repository folder relative and thus allow you to move the project folder anywhere you want. But beware – if you copy or move the Access file outside that folder, it cannot be kept under source code control because OASIS-SVN would then not have the .oasis file that OASIS-SVN needs. Click OK to close the dialog to save the changes to the settings. If you look in the folder, you’ll now see the .oasis file for your ACCDB file.
The .oasis file is just a XML file that contains all the project settings, and it has to have the same name as the ACCDB file so that OASIS-SVN knows that this ACCDB file should be under source code control. Thus, if you are in habit of renaming your ACCDB file, you will need to break that habit. If your existing workflow involves renaming of file, one approach I find handy is to use a fixed name for development copy (e.g. SampleApplication Dev.accdb, perhaps), then when I need to change the name, I make a copy of that file and provide the proper name. It must be emphasized that with it in source code control, renaming as means to keep track of versions makes less sense now since you should be able to recreate it from the git history rather than having a bunch of differently named copies.
Configuring the rest of settings
In previous step we only set up the source file since we had no .oasis file; had we made any other changes, it may not have been saved, but now we have one created as result of setting the project folder, we can review the rest of settings. It’s probably a good idea to consider having a template .oasis file so you can quickly copy and hand-tweak to have an uniform project setting for your different Access projects. Let’s go back to Settings button on the ribbon and start with the first tab on the dialog.
Object Types pane
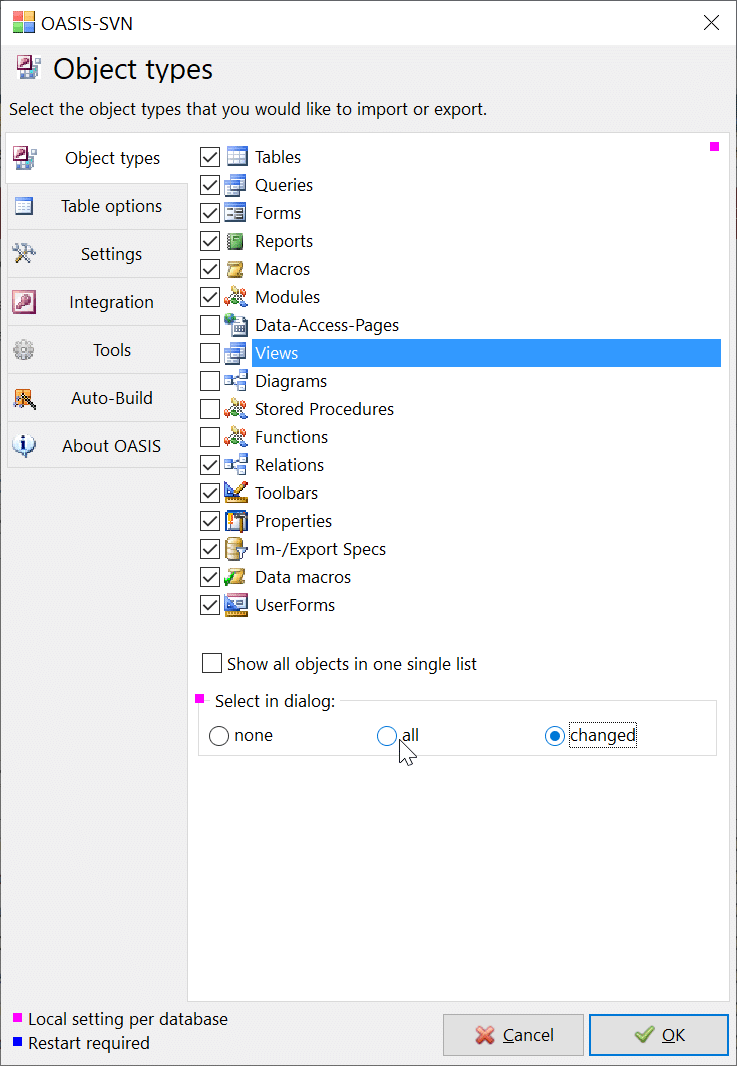
Because we no longer work with ADPs and we don’t use the deprecated Data Access Pages, we usually uncheck those as to keep the import/export dialog’s clutter to minimum. You may also find it handy to have it auto-select the auto-changed, which require tracking the object’s timestamp. However, be aware that object’s timestamp is not fully reliable within Access. We’ll discuss this more in later section. That said, it’s good way to help point out whether you might have forgotten to commit some stray object.
Table Options pane
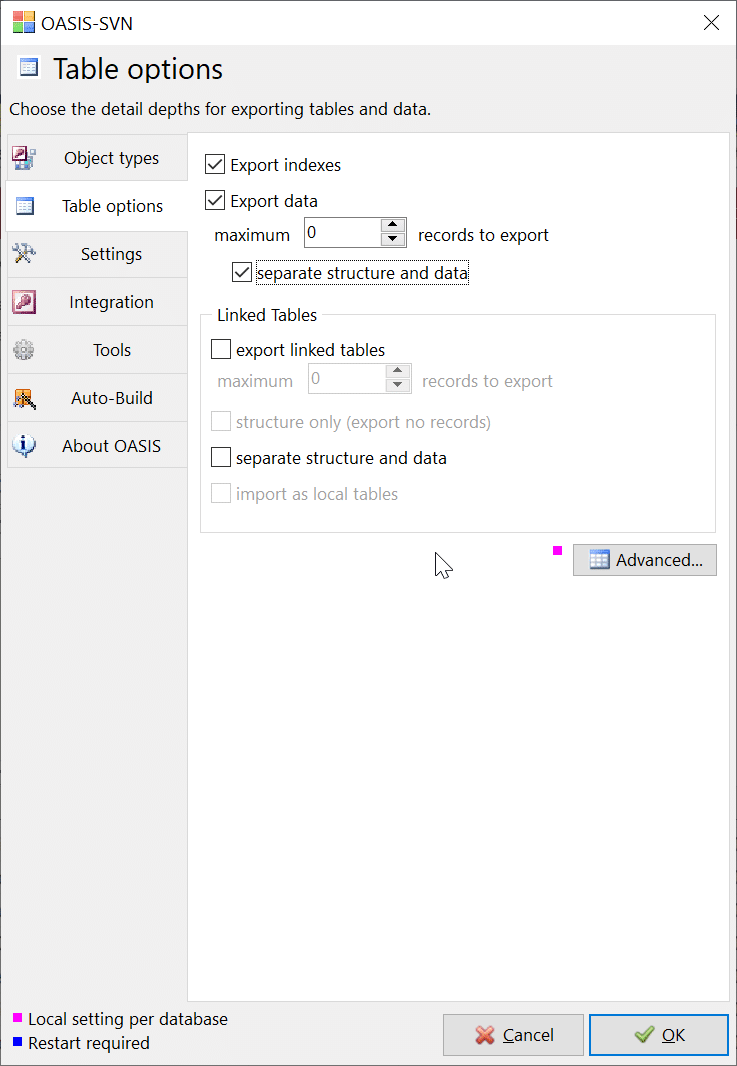
This pane will require some careful thoughts and will depend on the type of projects you are dealing with. The number one rule is that you do _not_ want to source code control the data in your tables. That does not make sense, since data isn’t code. However, that’s not always strictly true. For example, we have a number of tables we use as an application configuration data. Thus, in a sense, those tables are “code” since they influence how the application will work. Because the majority of our projects are Access front-ends with a SQL Server backends, the tables that are usually present are mainly just configuration tables and thus appropriate for source code control. But, if we had data tables, those probably shouldn’t be included. That is where the Advanced button comes in handy. Clicking this will open this dialog:
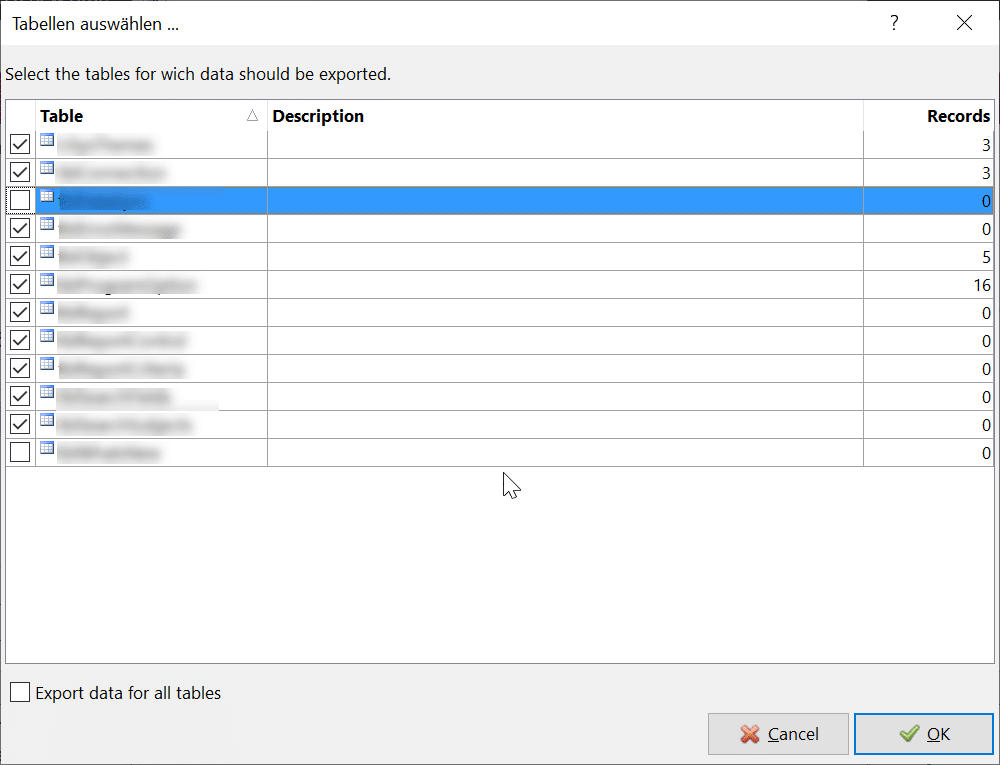
By unchecking the Export data for all tables checkbox on bottom, you can then select which tables’ data you wish to keep under source code control, excluding those that are just data table and not a part of the application source code.
We also generally don’t include ODBC linked tables because we usually have a code routine to relink the tables, so having it in source code control does not make sense for us. However, having the application configuration table or maybe even just the definition for local table is good idea since we’d have a broken application if we built a file from git repository without those tables’ definition.
Settings pane
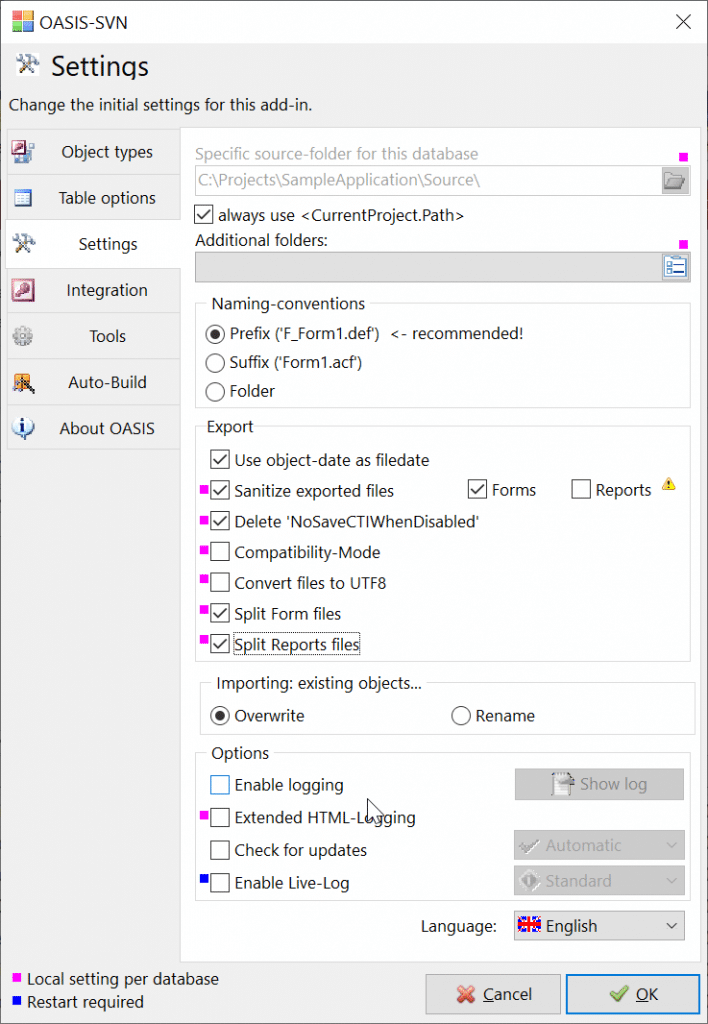
We already saw this before when we were creating the .oasis file. Now that we have the file, we will set up the rest of settings. Here’s our typical setup.
As I mentioned in the start, you could conceivably write your our own import/export routine. However, the value of OASIS-SVN is that we can address various issues that exists with the keeping Access text files under source code. For example, an Access text file might have the typical fields at the top of its file:
Version =21

VersionRequired =20

PublishOption =1

Checksum =-571006847

Begin Form

...

End Form
Those are bad for source code control because they can introduce unnecessary changes and pollute the history of changes that are not really changes. The checksum can change even though you may not have actually changed anything about the form itself. With OASIS-SVN, we can strip out that unnecessary data using the option Sanitize exported files:
Version =21

VersionRequired =20

Begin Form

...

End Form
You may have noticed a yellow warning icon for reports. The reason why it’s there is because OASIS-SVN will also strip away the printer data which is notoriously bad for source code control. When the reports uses the default printer, that is usually not a problem. However, it is not uncommon to create reports that depends on a specific printer. For example, maybe we have a report that’s making barcode label on a specialized printer. In that report, we’ll have chosen a specific printer rather than a default printer. Checking that box for reports means that the printer data will be blown away. If your project does not depends on any particular printer setups, you might find it easier to check off the reports. Otherwise, there is no reasons to not check it off for forms.
For similar reasons, we really love having Split Form files and Split Reports files option checked. Normally, Application.SaveAsText will export a singe text file for a single Access object. However, if you’ve read the text file, you’ll see that layout code can be … tedious to read. Checking this option means we get 2 text files per Access object; one to contain all layout data, and other the actual VBA source code behind the form. That makes code review much easier since you can focus on the VBA changes and understand what changed, which makes it easier to digest what the layout change is about.
You may recall that from the previous section on Object Types pane, we chose the changed, which requires us to save the object’s date/time as a file date/time. That is checked off here as well. It’s worth noting that Access does not always reliably stamp the timestamp when changing the objects. We will discuss this again in later section about making commits.
Integration pane
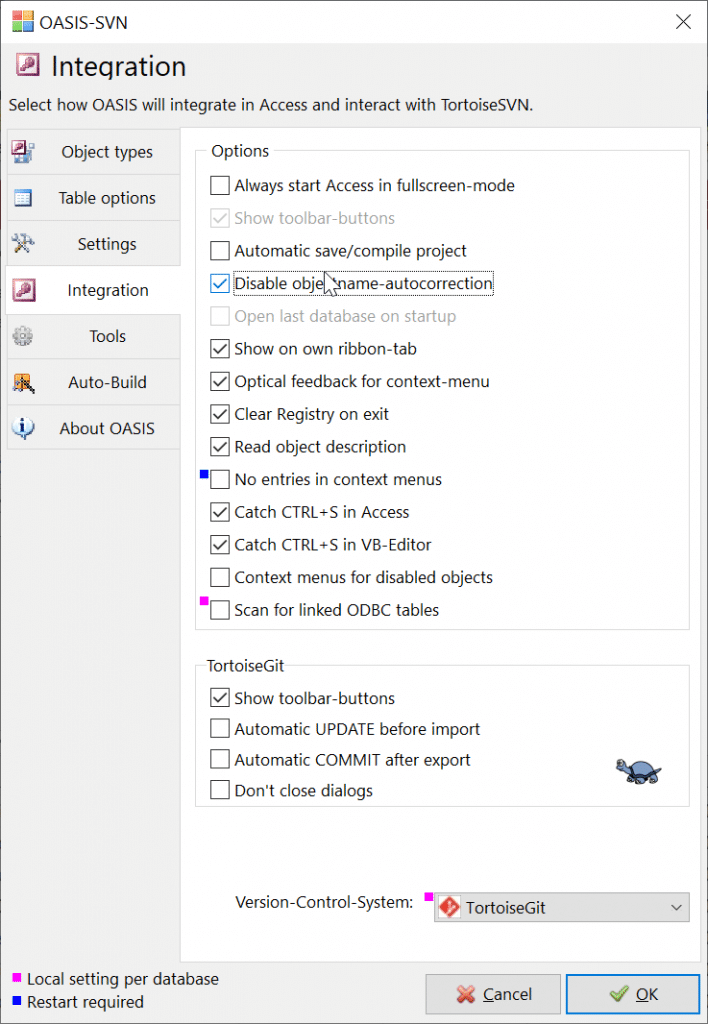
We usually want to ensure that the auto-correct is always turned off but more important are the option to use Ctrl+S as a hokey to do an export. That is very very helpful and avoids the problem with the Access object timestamp. However, this requires discipline to consistently use the keyboard shortcut to save the changes. Whenever you execute the keyboard, you will see this dialog shown briefly:

That ensures that your git working tree is kept as close in sync with your working ACCDB file as you work through the changes. It is important to emphasize that you do not need to be shy about saving frequently – it doesn’t have to mean that you need to commit every saves, but by saving frequently, your working tree will accurately reflect the extent of your changes when you are ready to commit. We will discuss that in details in later section.
Automatic UPDATE before import and Automatic COMMIT after export may seem like a convenient thing but in practice, we’ve found it much preferable to do this manually, especially when we are exporting with the Ctrl+S shortcut since we don’t necessarily want to commit; only save our work-in-progress so that we know what is changed when we are actually ready to commit. For that reason, we leave them off.
.oasis Setting File
Once you click OK on the settings dialog, the changes you’ve made in various pane will be then written to the .oasis file in a XML form. As mentioned, you can copy it and make a template so you have a quick way to configure another Access application. We are now ready to do some actual source code control.
Exporting and committing
As mentioned already, because we are working with a binary file, we need to export everything into a textual representation so that they can be properly managed by the source code control. To do this, we need to export the objects. You can use OASIS-SVN export button as indicated.

You will get a dialog with all object types listed for export. Since this is our first export, we will use Ctrl + A to select all for export.
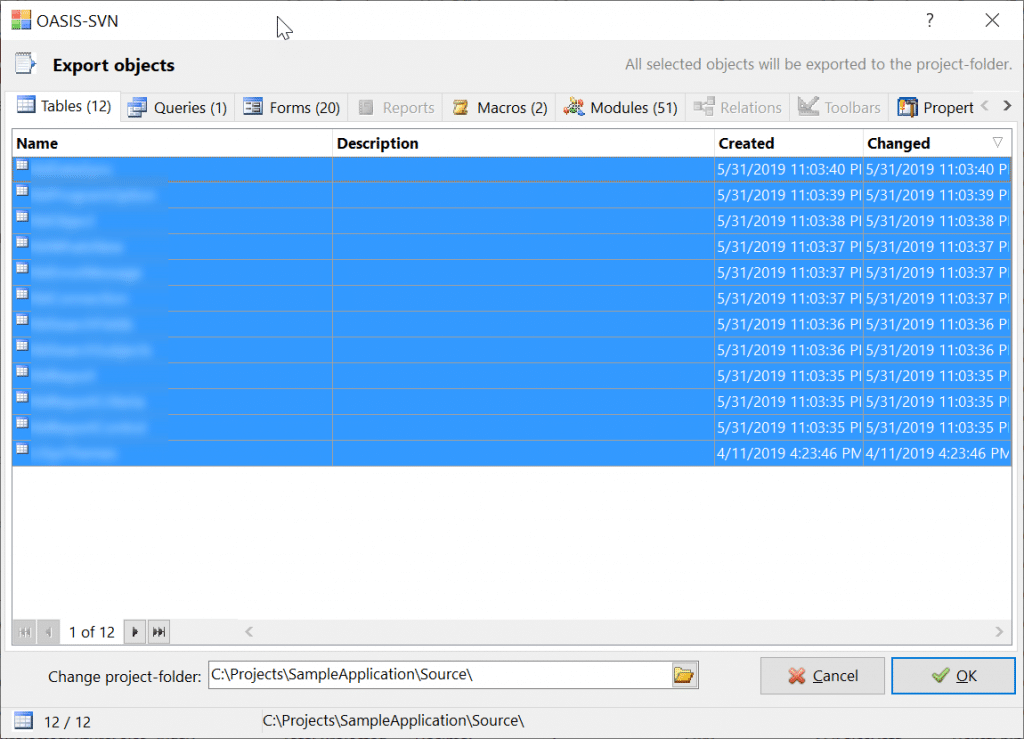
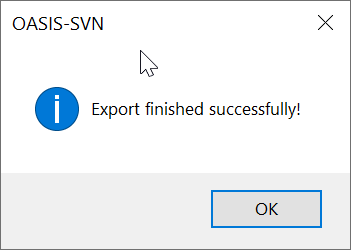
Click OK to finish the export. If all goes well, you’ll get a message indicating so.
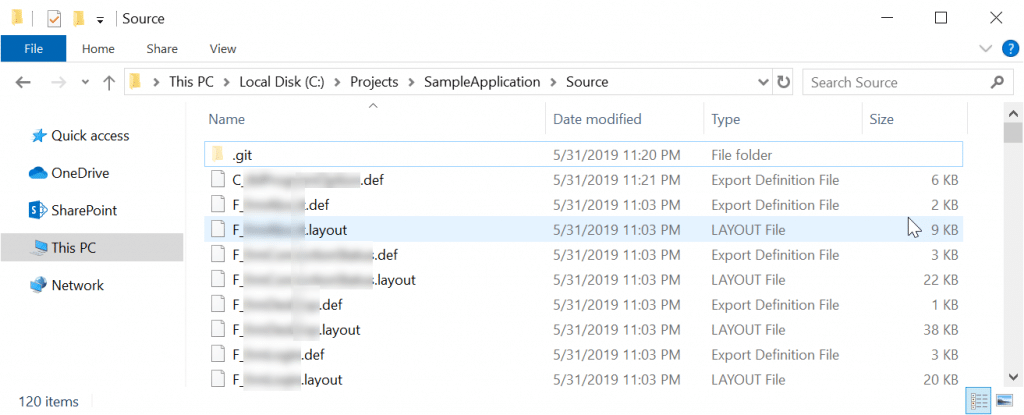
If you look inside the source folder, you’ll see all the text files representing various objects that you just exported. Note that naming convention may be different depending on what you selected in the Settings pane as shown in previous section. Also because we opted to split files, we have both a .def and a .layout file for a single Access object.
With the objects exported as text files, we now need to commit our changes. OASIS-SVN provides the TortoiseGit commands directly from inside Access as shown.
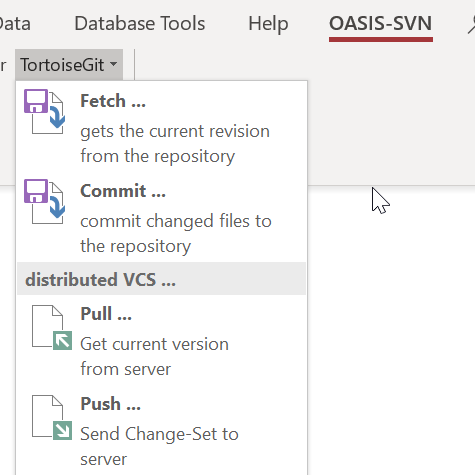
Typically the 4 commands you will want to use is shown here – the other commands are good to use but we don’t need to worry about that until we derive into to more complex git scenarios. By the way, those commands are actually the same command that are exposed by TortoiseGit via the Windows explorer’s context menu:
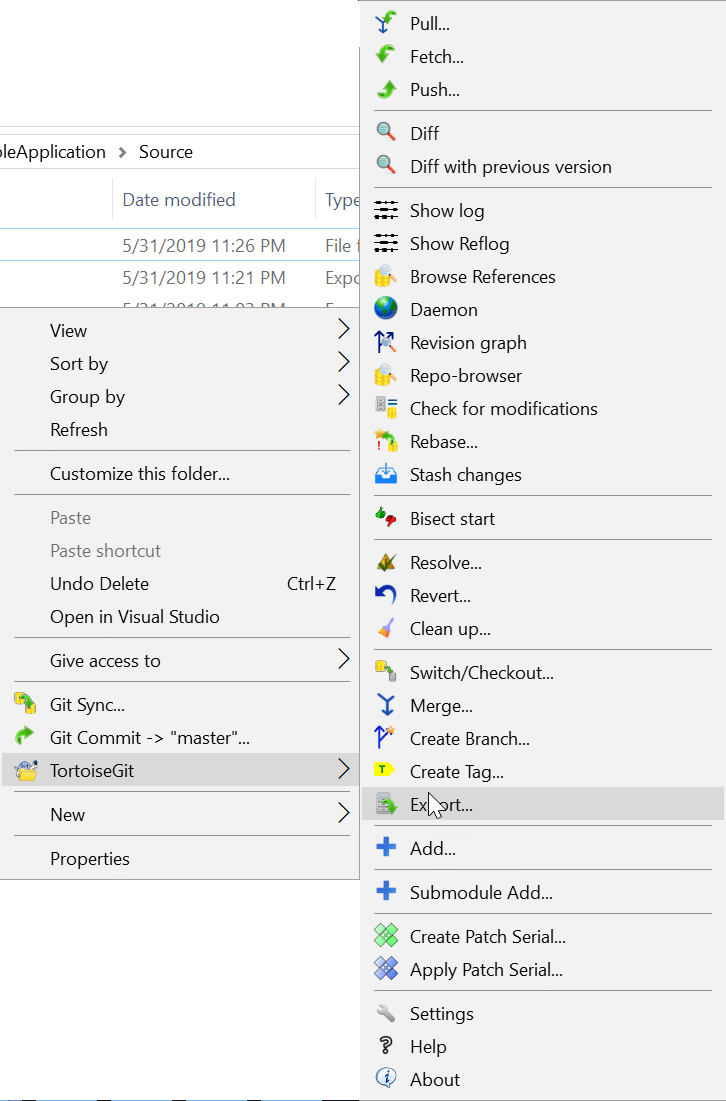
Furthermore, a subset of commands are available via right-click menu on Access navigation pane:
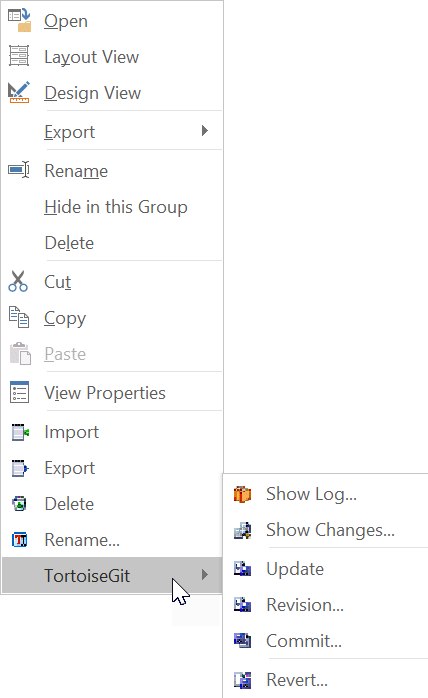
Thus, you have several ways to perform work with either OASIS-SVN or with TortoiseGit directly right out of Access, or you can just use TortotiseGit directly from the Windows explorer. Note that you have Commit in all screenshots; which is going to be our next step. Choosing it will open a TortoiseGit dialog:
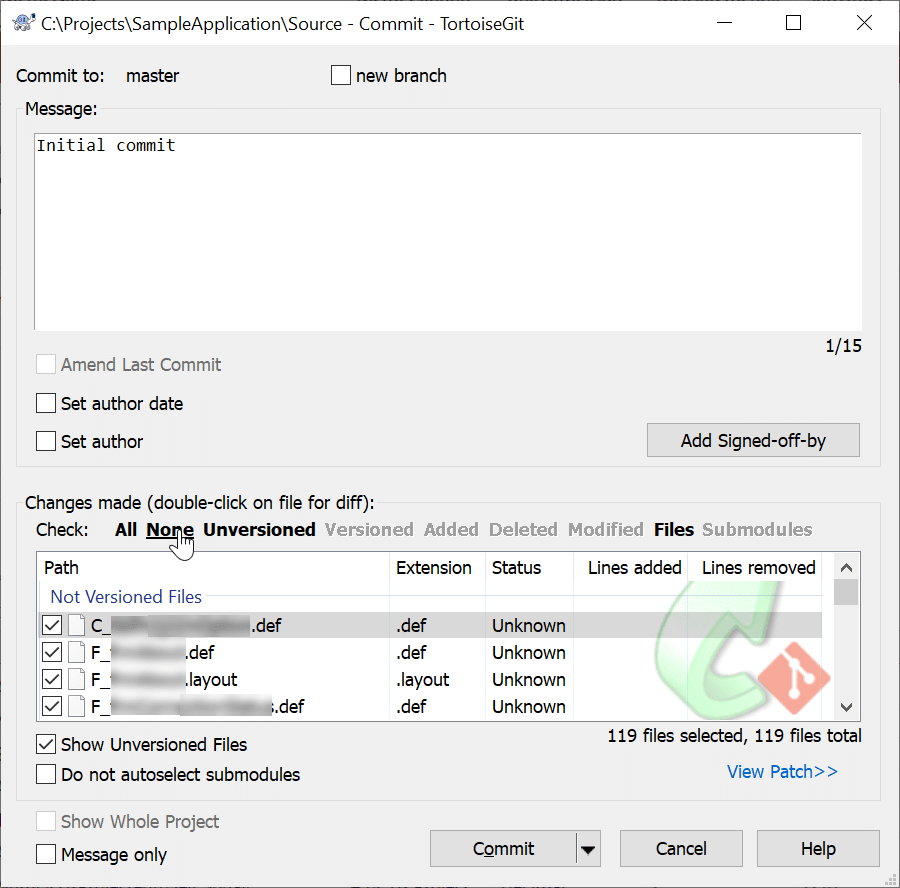
You will usually want to select all. Note that it only tracks the text files that we put in the project folder. That point is worth emphasizing; if you didn’t export an object from Access, git can’t possibly know about it. You need to provide a descriptive commit message; the detailed the better. We also prefer to do several small commits because that way the history is easier to understand. You don’t want to do a commit once a week with 1000 changes; that would be impossible to understand. You want a commit after you finish a task (e.g. fixing a specific bug, or introducing a feature), so that your history is easy to understand.
As you get in habit of committing your work, you might want to note that TortoiseGit gives you 3 options for committing:
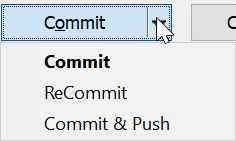
Recommit is useful if you need to make multiple commits because you did 2 or more tasks and you want to separate the commit for each task. It’s probably best to not have to do that and commit as soon as you finish a task but if you get caught up in excitement, you simply check only a subset of files you want to commit and click recommit. TortoiseGit will commit only those subset files, then reset the commit dialog so you can commit the other subset(s) of files with a separate message.
Commit & Push is used often to combine commit and push. It’s important to remember that commits only writes to your local git repository. But we started out with having a remote repository. You can’t share your code changes with your co-workers or have a remote backup of your work until you have pushed your local commits to the server, and that’s what push is for. We will discuss this in details later.
When you commit, TortoiseGit will provide you a progress dialog, and notify you if it was successful.
Wrapping up
So far you’ve learnt how to set up a git repository, get OASIS configured and do your first commit. However, that is barely scratching the surface. The full power of git is not yet apparent until you get into branching, reading the history and resolving the conflicts. However, those are strictly git things and have less to do with either Access or OASIS; any general git guide which we already linked at the start of article will be very helpful for understanding how to manage a git repository. It’s worthwhile to remind that TortoiseGit is just a thin GUI wrapper over git commands, so even if the tutorial talks about using a bash shell, you should be able to do the same thing via TortoiseGit menu having the same name. Have questions? Ask away in comments!
I am currently using Oasis-SVN with TortoiseGit in an Access project.
I am trying to figure out how to synchronize the objects in my Access project when I change to a different branch in my local repository.
Whenever I move to a different branch in the local repository, all the objects in Access remain unchanged and I’m left with objects that don’t belong in that branch.
For example:
I have two branches, Master_branch and Test_branch.
Master_branch has 1 form, called “Master Form”.
Test_branch has 2 forms, called “Master_Form” and “Test_Form”.
Using TortoiseGit on the Source folder, I move to the “Test_branch”.
I open Access and import objects from “Test_branch”.
The two forms, “Master_Form” and “Test_Form” are available in my Access project.
I now want to move to “Master_branch” and I should only see “Master_Form” in Access.
But when I move to “Master_branch” the two forms are still there.
Therefore Access hasn’t synced with “Master_branch”.
Right now the only way I can think of syncing is by deleting all the objects in Access then importing them again after moving to a different branch.
Are there any ways of syncing Access when I change to a different branch?
A bit a delayed answer, but I started using OASIS only recently. I had the same question.
It seems to work like this: when you move to another branch, the set of files in the /Source folder is updated accordingly by TortoiseGit. However, they are not updated (synced) in Access, as OP points out.
For this last step, you not only need to import the objects but also need to delete the removed objects.
In the import dialog, OASIS has a small button Delete (trash-can with question mark). Use that button and all objects which are no longer present in /Source (i.e. which are not present in the active branch) will be deleted from Access. That will remove “Test_form” in OP’s question.
Great article. I built my own source code exporter/importer a while back. I like the idea of splitting the UI and VBA into seperate files – that would be a big improvement to my own tools.
The biggest nuisance for me has been the way MS Access dis-respects case and scope. If you import a module with a variable or object name of say “userName” then every reference to userName throughout the project is updated regardless of scope. So a reference that was once called UserName is now called userName. This means when you export an unrelated module you get a whole bunch changes due to SVN and Git tools being case-sensitive. You can see this behaviour just by declaring a constant in one module with different case to that used in other modules. Everything flips to the new representation. You would think this would eventually settle down but in my experience the flipping just keeps occurring and you can’t always remember the case used across all projects when sharing common code modules. The result is a lot of curn in the source control similar to the “Version =21” /20 which keeps flipping as well.
That was a long intro to ask this: “Do you know if OASIS-SVN provides any tools to help with this situation?”. I have often wondered about writing a naming dictionary which would be used to auto-replace all instances of problematic variable names with the correct spelling. This gets complex though as you need to be careful to avoid captions and quoted text.
For the specific case of Version (and other attributes) that are troublesome for source code, yes, OASIS-SVN has two settings — `NoSaveCTIWhenDisabled` and `Compatibility Mode` located in the Settings pane in the Settings dialog. That will remove `Version` and `NoSaveCTIWhenDisabled` and few other that are not required but would change everytime you export, which is bad for source code control.
As for the lettercasing… that is not really something that OASIS-SVN nor any other tools can help with because of how VBA works. Usually, when the lettercasing revert, it’s because there is an object with a bad lettercasing. As an example, if you have a control named `MYLAMEBOX`, and on a standard module, you create a new variable `MyLameBox`, it’ll _seem_ to take the `MyLameBox`…. until you restart or open/close, then it will revert to `MYLAMEBOX`. IOW, controls or form/report names take precedence. Therefore, to fix this, you must rename the control — usually to `tempName` then save, then again to `MyLameBox` then this will preserve.
I hope that helps!
Excellent! I’ve been struggling to understand the value of OASIS-SVN and have a much clearer understanding of its use. Very clear, except: “we really love having Split Form files and Split Reports files option not checked.” The paragraph is about the advantages of using Split Form/Report files so is that “not” a typo? Thanks so much and I’m looking forward to learning more at the webinar.
Indeed. That was a typo, sorry for the confusion!